

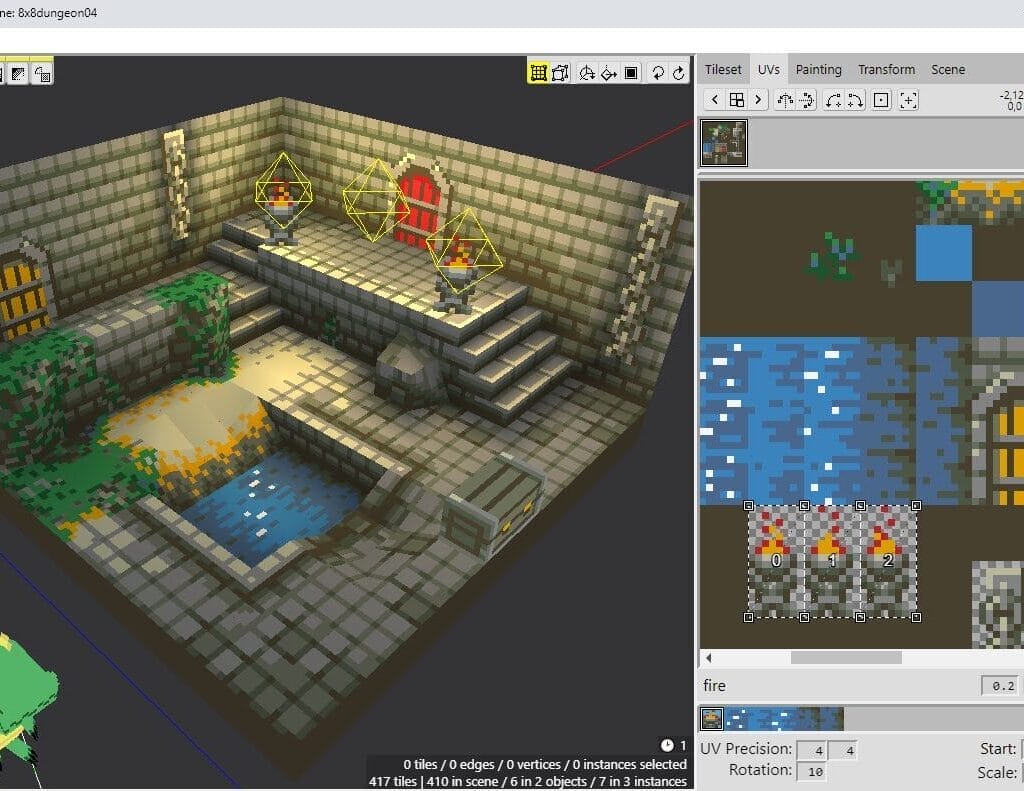
Crocotile 3D is a specialized tile-based 3D modeling editor that empowers developers and artists to create low-poly, pixel-art-style models and scenes with ease. Unlike traditional 3D software like Blender or Maya, Crocotile 3D uses 2D tilesets to construct 3D environments, making it ideal for retro-style game development, such as PS1-era horror games or indie projects in Godot or Unity. This SEO-optimized, 2,000-word guide dives deep into how to use Crocotile 3D, its benefits and disadvantages, a detailed case study, advanced tips, and strategies to maximize its potential for game developers and artists.

What is Crocotile 3D?
Crocotile 3D is a unique tool that bridges 2D and 3D workflows by allowing users to place 2D tiles from a tileset into a 3D space, giving them depth and form. Released in 2015 by developer Joshua McLean, it has evolved into a go-to editor for creating low-poly models, environments, and animations with a pixel-art aesthetic. Available on Windows, macOS, Linux, and Steam, it offers a free trial (limited to saving 100 tiles) and requires a registration key or Steam purchase for full functionality, including unlimited saving and exporting.
Core Features:
- Draw and Edit Modes: Place and modify tiles with precision.
- Tileset Integration: Import 2D tilesets (e.g., from Aseprite) for 3D construction.
- Animation Tools: Create animations for UVs, objects, or characters.
- Skinning and Rigging: Add bones and vertex weights for animated models.
- Export Options: Save as OBJ, GLTF, or Godot GridMap for game engines.
- Lighting and Shadows: Enhance scenes with baked lighting and vertex colors.
- Cross-Platform Support: Runs seamlessly across multiple operating systems.
This article will walk you through using Crocotile 3D, highlight its strengths and weaknesses, provide a real-world case study, and offer actionable tips to optimize your workflow.
How to Use Crocotile 3D: A Step-by-Step Tutorial
Crocotile 3D is designed to be accessible yet powerful. Below is a comprehensive guide to mastering its workflow, based on the official documentation and community insights from the Crocotile 3D Discord.
1. Getting Started with Crocotile 3D
- Download and Installation: Visit the official website or Steam page to download Crocotile 3D. The free version allows testing but limits saving to 100 tiles and disables exporting. Purchase a registration key or the Steam version for full access.
- Interface Breakdown: The interface includes a 3D viewport for scene creation, a Tileset window for selecting tiles, and panels for animations, objects, and settings. Use the spacebar and mouse to rotate (hold spacebar + drag), zoom (scroll), and pan (right-click + drag) the camera.
- Hotkeys and Controls: Familiarize yourself with key shortcuts, such as E for rotation, R for flipping tiles, and Alt + right-click to eyedrop tiles. The documentation lists all hotkeys for quick reference.
2. Importing and Managing Tilesets
- Creating Tilesets: Design a 2D tileset in tools like Aseprite or Photoshop. Ensure tiles are uniformly sized (e.g., 16×16 or 32×32 pixels) to avoid alignment issues.
- Importing: In the Tileset window, click “Add Tileset” and load your PNG file. Adjust UV padding (e.g., 1-2 pixels) to prevent texture bleeding. The documentation recommends testing tileset scaling before building.
- Selecting Tiles: Click a tile in the Tileset window to set it as your active “brush” for placing in the 3D scene.
3. Building 3D Scenes
- Draw Mode: Click in the 3D viewport to place tiles, using the 3D crosshair as a guide. Hold Alt + left-click to apply the brush to existing tiles or Alt + right-click to eyedrop a tile’s properties.
- Edit Mode: Select vertices, edges, or faces to modify tile geometry. Use tools like Split (Ctrl + click), Cut, or Merge to create custom shapes. Rotate (E), flip (R), or scale tiles as needed.
- Object Management: Group tiles into objects or prefabs via the Objects panel for easier manipulation. Use the Transform tool to translate or rotate entire objects.
4. Advanced Features
- Animation: In the Animation panel, add keyframes to animate UVs, objects, or bones. Duplicate actions or adjust attributes for effects like flowing water or character movement. The YouTube channel has tutorials on animation workflows.
- Skinning and Rigging: Add bones and assign vertex weights in the Skinning panel for character animations. This is ideal for low-poly models like NPCs or enemies.
- Painting: Use the Paint Editor to create or edit tilesets directly in Crocotile 3D. Adjust vertex colors or apply textures for stylized effects.
- Lighting and Shadows: Add lights in the Scene panel and bake shadows for atmospheric scenes. Experiment with ambient occlusion for depth.
5. Exporting to Game Engines
- Formats: Export scenes as OBJ, GLTF, or Godot GridMap. For Godot, enable “force disable mesh compression” to preserve UVs and animations.
- Workflow Tips: Test exports early to catch issues like seams or missing textures. The Discord community often shares engine-specific fixes.
- Integration: Import models into Unity or Godot and apply shaders or scripts for interactivity.
6. Learning Resources
- Watch tutorials on the Crocotile 3D YouTube channel for visual guidance.
- Read the official documentation for detailed explanations of tools and settings.
- Join the Crocotile 3D Discord for real-time support and community tips.
- Explore the gallery for inspiration from other users’ projects.
Benefits of Crocotile 3D
Crocotile 3D offers a range of advantages, making it a favorite among indie developers and pixel-art enthusiasts:
- Streamlined Workflow:
- Perfect for Retro Aesthetics:
- Game Engine Compatibility:
- Active Development and Community:
- Regular updates (e.g., v2.2.9 in February 2024) introduce features like improved animations and smoothing groups, as noted in update logs.
- The Discord server and Patreon foster collaboration and provide direct developer support.
- Cross-Platform Flexibility:
- Affordable Pricing:
- A one-time purchase unlocks full functionality, unlike subscription-based tools like Adobe Substance 3D.
Disadvantages of Crocotile 3D
Despite its strengths, Crocotile 3D has limitations that may affect certain users:
- Learning Curve for 3D Newcomers:
- The unique control scheme (e.g., spacebar for camera rotation) can feel unintuitive. Users on Reddit have noted difficulty adapting to hotkeys.
- The documentation, while comprehensive, may overwhelm beginners without video tutorials.
- Niche Focus:
- Free Version Limitations:
- The free trial restricts saving (over 100 tiles) and exporting, requiring a paid key or Steam purchase. This may deter casual users.
- No subscription option, which could be a barrier for budget-conscious developers.
- Occasional Technical Issues:
- Users report bugs, such as OBJ import failures with spaces in filenames or seams in Godot exports. Fixes are released, but these can disrupt workflows.
- Some features, like smoothing groups, are still evolving, as noted in update logs.
- Limited Scope for Large Projects:
- Managing complex scenes with many objects can be cumbersome compared to tools like Unity’s ProBuilder.
- Not ideal for massive open-world environments due to its tile-based approach.
Case Study: Creating a PS1-Style Horror Game Environment
Project Overview: An indie developer used Crocotile 3D to build a low-poly sewer environment for a PS1-style horror game in Godot, inspired by classics like Silent Hill.
Workflow:
- Tileset Design: The developer created a 16×16 pixel tileset in Aseprite, featuring grimy walls, rusted pipes, and murky water textures. The tileset was imported into Crocotile 3D with 1-pixel UV padding to prevent bleeding.
- Scene Construction: In Draw Mode, tiles were placed to form a winding sewer corridor. Edit Mode refined geometry, adding curves to pipes and angles to walls. Baked lighting and ambient occlusion created a moody, oppressive atmosphere.
- Animation: Animated water tiles were crafted using UV animation tools. Keyframes simulated flowing water, synced to Godot’s animation system.
- Rigging: A low-poly rat NPC was rigged with bones and vertex weights for subtle idle animations, enhancing immersion.
- Exporting: The scene was exported as a GridMap for Godot. The developer disabled mesh compression to preserve UV animations, following Discord community advice.
- Integration: In Godot, the scene was paired with a custom fog shader and audio triggers for dripping water, completing the horror aesthetic.
Results:
- Time Efficiency: The environment was built in two days, compared to an estimated week in Blender, thanks to Crocotile 3D’s intuitive workflow.
- Community Feedback: Shared on Reddit’s r/godot, the scene received praise for its authentic PS1 vibe, with 200+ upvotes.
- Challenges: Minor export issues (e.g., texture seams) required manual fixes, but Discord support provided quick solutions.
Key Takeaway: Crocotile 3D excels for small teams targeting retro aesthetics, offering speed and simplicity. However, users should anticipate occasional export hiccups and leverage community resources.
Advanced Tips for Mastering Crocotile 3D
To elevate your Crocotile 3D projects, consider these expert strategies:
- Optimize Tilesets:
- Use Fast Palette to create cohesive color schemes for tilesets, ensuring visual consistency.
- Keep tileset sizes small (e.g., 16×16 or 32×32) to maintain pixel-art clarity and reduce export file sizes.
- Leverage Animation Tools:
- Experiment with UV animations for dynamic effects like flickering lights or moving machinery. The YouTube tutorials demonstrate advanced techniques.
- Use action duplication to create variations of animations efficiently.
- Streamline Game Engine Integration:
- For Godot, predefine collision shapes in Crocotile 3D to simplify level design.
- In Unity, apply Crocotile’s exported models to prefabs for modular level construction.
- Community Collaboration:
Conclusion
Crocotile 3D is a game-changer for indie developers and artists seeking to create low-poly, pixel-art 3D models and scenes. Its tile-based workflow, intuitive tools, and compatibility with Godot and Unity make it a standout choice for retro-style projects. While it has limitations, such as a niche focus and occasional bugs, its benefits—simplicity, affordability, and community support—far outweigh the drawbacks for its target audience.
Whether you’re crafting a PS1-inspired horror game, a quirky RPG, or a pixel-art diorama, Crocotile 3D empowers you to bring your vision to life. Download it from the official website or Steam, explore the tutorials, and join the Discord community to start creating today.
Have you built something amazing with Crocotile 3D? Share your projects in the comments, post them to the gallery, or tag us on Twitter! Let’s inspire the indie dev community together.
A game developer that wants to share its knowledge and experience with other game developers-


