
Awake and Start in Unity Introduction
In Unity’s scripting lifecycle, two beginner-friendly concepts often come up: the Awake and Start functions. These functions are fundamental to how scripts operate and interact within a Unity project. Understanding them can help streamline your script’s initialization process and make your Unity games and applications more efficient.

Understanding Awake and Start Functions in Unity
Awake and Start are two functions that are automatically called when a script component is loaded. These functions manage what happens when your scripts begin their lifecycle. By effectively utilizing these methods, you can optimize the initialization of components and set up necessary references between scripts.
The Role of Awake
The Awake function is the first to be called during the script’s lifecycle. It’s invoked even if the script component is not enabled, making it the ideal place to perform initial setup tasks that don’t rely on the script being active. This method is particularly useful for establishing references between scripts or initializing variables that do not require active logic.
void Awake(){// Example initialization codeDebug.Log("Awake is called. Initializing references.");}The Role of Start
The Start function is called after Awake, but only if the script component is enabled. It typically runs right before the first frame update, which means that you can defer initialization tasks until they are truly required. This can be crucial for performance optimization, as it allows you to delay executing code until it’s needed.
void Start(){// Logic to execute when the script is enabledDebug.Log("Start is called. Ready to go!");}The Lifecycle of Awake and Start
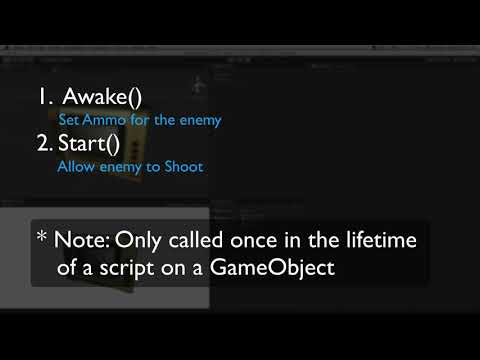
Awake and Start are typically called only once during the lifetime of a particular script instance. This means that even if you disable and then re-enable a script component, these methods will not be invoked again. This behavior ensures that your initialization code doesn’t reset unexpectedly upon component deactivation.
Practical Example: Enemy Initial Setup
Imagine an enemy character in a game; you could use Awake to assign attributes, such as health or ammo count, while assigning dynamic abilities, like the ability to shoot, within Start. By arranging the logic this way, you maintain efficiency and clarity within your script.
void Awake(){ammoCount = 30;Debug.Log("Ammo count set in Awake.");}void Start(){isAbleToShoot = true;Debug.Log("Shooting ability enabled in Start.");}Understanding Through Debugging
A great way to understand when these functions are called is to use debugging tools like Debug.Log. This can help you visualize the sequence in which the Awake and Start functions are activated during runtime.
void Awake(){Debug.Log("Awake function is triggered.");}void Start(){Debug.Log("Start function is triggered.");}Running the above scripts while toggling the active state of the script allows you to see these messages in the console, giving you clear insight into their execution order.

Efficient Script Management
Utilizing Awake and Start properly can simplify your game’s architecture and improve performance by properly managing when resources are initialized or activated. By initializing settings before they are needed, you can avoid splitting scripts unnecessarily and keep your codebase organized.
“This allows you to initialize settings for an object before enabling that script component without the need for splitting the script into several different scripts.”
Consider using these built-in lifecycle hooks to organize initialization tasks within your Unity scripting projects. By following the best practices discussed here, you can ensure your Unity projects are running efficiently and are easy to maintain.
Adopting and mastering these concepts not only enhances the performance of your game but also promotes a cleaner, more understandable codebase. Whether you’re developing your first game or building advanced applications, mastering Awake and Start is an essential step in leveraging Unity to its fullest potential.
Feel free to explore Unity’s documentation and practice with the samples provided to gain a stronger grasp of these concepts. As you grow more familiar with Unity’s lifecycle, you’ll be able to create more complex scripts and further optimize your game development workflow.
Keep scripting, and as always, happy developing!
A game developer that wants to share its knowledge and experience with other game developers-


