
Create a Realistic Forest in 30 Minutes 🌲 Key Takeaways: Your Quick Guide 🌲
Before we dive deep, here’s a glimpse of what you’ll achieve:
- Effortless Landscapes: Learn to generate vast, customizable terrains instantly using Blender’s built-in ANT Landscape generator. No complex sculpting needed initially!
- Realistic Texturing: Discover how to mix rock and grass textures naturally using node-based techniques, focusing detail where it matters most – on the peaks and in the crevices.
- Efficient Forest Population: Utilize Blender’s powerful particle system to distribute thousands of trees intelligently, optimizing performance with weight painting.
- Atmospheric Fog Mastery: Explore a clever, performance-friendly alternative to volumetrics for creating deep, wispy fog using textured planes.
- Scene Setup & Lighting: Set up your scene with HDR lighting for instant realism and position your camera for breathtaking aerial shots.
Creating stunning, large-scale natural environments can seem daunting. How do you handle massive landscapes? How do you populate them with thousands, even millions, of trees without grinding your computer to a halt? And how do you add that crucial sense of scale and atmosphere? Today, we’ll tackle exactly that, focusing on building beautiful, sprawling aerial forests right within Blender 2.8x (though the principles apply to later versions too!). This process is incredibly fun and yields fantastic results.
Before we begin sculpting mountains and planting digital trees, a quick note: many initiatives are working to reforest our planet. One such effort is Team Trees – consider checking them out; every contribution helps plant real trees, aiming for a massive positive impact. 🌱
Also, a thank you to Concierge Render Farm for sponsoring the original tutorial content. Rendering large scenes like this, especially animations, can take time. Cloud render farms offer immense power with thousands of GPUs, supporting both Eevee and Cycles, making them a great option for finalizing complex projects quickly. We’ll even touch upon rendering our scene later.
Ready to build a world? Let’s get started.
Sculpting Your Digital World: The Landscape
First things first: we need land. Forget painstakingly sculpting every detail by hand for this scale. Blender has a fantastic built-in tool perfect for this.
Enabling Essential Tools
To make life easier, we need two specific add-ons enabled.
- Go to
Edit>Preferences. - Navigate to the
Add-onssection. - Search for “ANT Landscape” and check the box to enable the A.N.T. Landscape generator. This is our mountain maker!
- While you’re there, search for “Node Wrangler” and enable it too. This add-on provides invaluable shortcuts for working with materials later on.
Generating the Base Mesh
With the tools ready, let’s clear the default scene and create our landscape.
- Select the default cube (if present) and press
XthenDelete. Buh-bye, cube! - Press
Shift + Ato bring up the Add menu. Go toMesh>Landscape. Voila! Instant terrain.
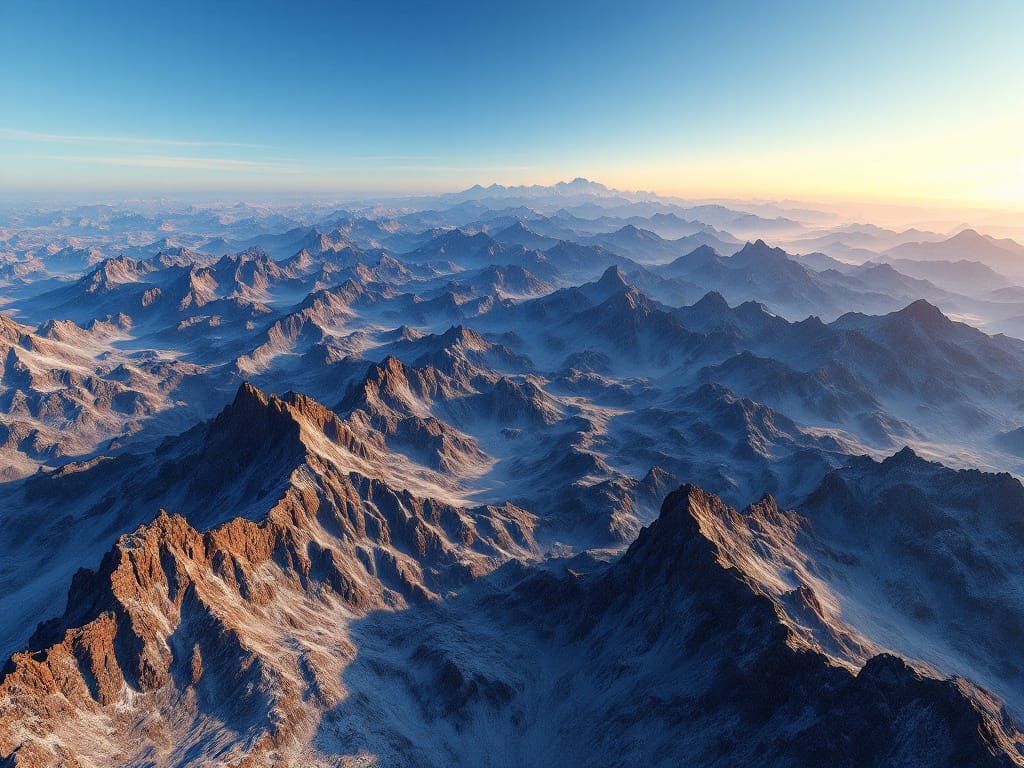
Shaping Your Mountains: The Landscape Settings
Immediately after adding the landscape, a settings panel appears in the bottom-left corner of the viewport. Important: Once you click off the landscape or perform another action, these settings disappear! So, dial them in now.
- Scale X & Y: Click and drag down over both X and Y values to select them simultaneously. Increase the size significantly. A value around
20to24works well for a large vista. - Noise Scale / Size: This controls the size of the noise features (the bumps and valleys). Increase this to something like
2.0or2.5to make the features larger and less busy. - Height / Maximum Height: The default height is too small. First, increase the
Maximumheight value (try5.0). Then, adjust theHeightslider itself. For vast, rolling hills seen from afar, you don’t need extremely sharp peaks. AHeightof around1.5can create a nice sense of scale without being overly dramatic. It should feel vast, not necessarily spiky. - Falloff: Set this to
Y. This makes the landscape extend infinitely along the X-axis but fall off along the Y-axis, useful for creating a long, continuous range. - Noise Type: Experiment! The default
Noiseis great, but tryfBm,Hetero Terrain, or others to see different mountain styles. Stick with the default if you like the initial look. - Mesh Resolution: Increase the
Mesh Size XandYvalues for more detail. Click and drag to select both, and aim for around256(or close to it, like240). This adds more geometry for finer details in the terrain shape and later texturing.
Tweak these values until you have a base landscape you’re happy with. Remember, you cant easily go back to this specific menu later.

Setting the Stage: Lighting and Camera
With our landmass formed, let’s set up the basic scene elements: lighting and camera angle.
Natural Light with HDRs
We’re aiming for realism, and High Dynamic Range Images (HDRIs) are perfect for lighting outdoor scenes naturally.
- Delete the default Point Lamp (
X>Delete). - Go to the
World Propertiestab (the little red globe icon). - Click the yellow dot next to
Colorand chooseEnvironment Texture. - Click
Openand navigate to an HDRI file. A great resource for free, high-quality HDRIs is HDR Haven (now Poly Haven). Find one with a nice sky and sun position – an outdoor, cloudy sky works well. - Switch to the
Shader Editorwindow (you might need to split your viewport and change one panel to Shader Editor). - In the Shader Editor, switch from
ObjecttoWorld. You’ll see the Environment Texture node. - Select the Environment Texture node and press
Ctrl + T(this requires the Node Wrangler add-on we enabled earlier). This addsTexture CoordinateandMappingnodes. - Use the
Rotation Zvalue on theMappingnode to spin the HDRI environment around until the sunlight hits your mountains from an angle you like. You can see this effect if you switch your viewport shading toRendered.
Framing Your Masterpiece: Camera Setup
Let’s find a dramatic aerial perspective.
- Navigate your viewport to an angle you find compelling – looking across the mountain range, perhaps slightly elevated.
- Press
Alt + Ctrl + 0(zero) to snap the active camera to your current view. - Select the Camera object. Go to the
Object Data Properties(the green camera icon). - Adjust the
Focal Length. A wider angle, like30mm, can enhance the sense of scale for landscapes. - Use
G(Grab/Move) andR(Rotate – double-tapRfor trackball rotation) to fine-tune the camera position and angle until the horizon looks good and the composition feels balanced.
Choosing Your Render Engine: Cycles and GPU Power
For the best realism, especially with lighting and materials:
- Go to the
Render Propertiestab (the camera icon). - Set the
Render EnginetoCycles. - If you have a compatible graphics card (GPU), change the
DevicefromCPUtoGPU Compute. This significantly speeds up rendering.- Pro Tip (NVIDIA RTX): If you have an NVIDIA RTX card, go to
Edit>Preferences>System. UnderCycles Render Devices, chooseOptiX. Make sure your RTX card is checked. This utilizes the dedicated RT cores for even faster rendering in Blender 2.81 and newer. Rendering with OptiX often makes RTX cards a fantastic value for Blender users.
- Pro Tip (NVIDIA RTX): If you have an NVIDIA RTX card, go to
Now, switch your viewport shading mode to Rendered (usually the far-right sphere icon at the top-right of the viewport). You should see your landscape illuminated by the HDRI. You might need to adjust the HDRI rotation (Mapping node) again slightly to get the light hitting the peaks just right. A Z Rotation like -2.5 radians might create nice highlights.
Breathing Life into Rock and Soil: Texturing the Terrain
An untextured landscape looks plain. Let’s add realistic rock and grass materials that cleverly blend based on the terrain’s shape.
Smoothing Things Out
Before texturing, let’s smooth the landscape slightly.
- Select the landscape object.
- Go to the
Modifier Properties(the blue wrench icon). - Click
Add Modifierand chooseSubdivision Surface. This adds more geometry and smooths out sharp edges and harsh shadows, giving a more natural look. A level of1in the viewport is usually sufficient.
The Shader Node Magic ✨
We’ll use the Shader Editor extensively here. Make sure it’s open.
- Select the landscape object. Ensure you’re viewing
Objectnodes, notWorldnodes. - Click the
Newbutton to create a new material. APrincipled BSDFshader appears by default. This will be our base.
Adding Rock Texture
- Add an
Image Texturenode (Shift + A>Texture>Image Texture). - Click
Openand load a rock texture. Seamless cliff or rock textures work best. You can find good options on sites like Textures.com (you might need an account). Let’s call this the “Rock Diffuse” texture. - Connect the
Coloroutput of the Image Texture node to theBase Colorinput of thePrincipled BSDF.
UV Unwrapping
The texture needs to be mapped correctly onto the complex surface.
- Split your view again and open the
UV Editorin one panel. - In the UV Editor, open the same rock texture image you just loaded.
- Select your landscape object. Press
Tabto enter Edit Mode. - Press
Ato select all vertices. - Press
Uto open the UV Mapping menu and chooseUnwrap. Your landscape’s UVs should appear as a square in the UV Editor. - In the UV Editor, press
Ato select all UVs, thenSto scale. Scale it way up (e.g., type40and press Enter). This tiles the texture across the landscape, making it appear at an appropriate scale for a large mountain.
The Pointiness Mask: Separating Peaks and Crevices
Here’s the clever part: we’ll use the geometry itself to decide where rock appears (peaks) and where grass grows (flatter areas/crevices).
- Add a
Geometrynode (Shift + A>Input>Geometry). - Add a
ColorRampnode (Shift + A>Converter>ColorRamp). - Connect the
Pointinessoutput from the Geometry node to theFacinput of the ColorRamp. - Visualize: Select the ColorRamp node and press
Ctrl + Shift + Click(Node Wrangler shortcut). Your landscape should turn black and white. The whitest areas are the sharpest edges (peaks), and the black areas are flatter or inverted (crevices). - Adjust the ColorRamp: Drag the black and white sliders closer together in the middle. This crushes the values, creating a sharper contrast mask. You want clear white peaks and black valleys.
Mixing Rock and Grass
Now we use this mask to mix two materials.
- Add a
Mix Shadernode (Shift + A>Shader>Mix Shader). Place it between the initialPrincipled BSDFand theMaterial Output. - Duplicate the
Principled BSDFnode (Shift + D). This will be our grass shader. - Connect the original Principled BSDF (which has the rock texture connected) to the bottom
Shaderinput of the Mix Shader. - Connect the duplicated Principled BSDF to the top
Shaderinput of the Mix Shader. - Connect the
Coloroutput of thePointiness ColorRampnode to theFacinput of the Mix Shader.
Result: You should now see the grass material (currently plain white) on the peaks and the rock texture in the crevices. We actually want the opposite!
- Flip the Inputs: Swap the connections on the Mix Shader. Connect the grass shader (the duplicated one) to the bottom socket, and the rock shader (the original one) to the top socket. Now rocks appear on the peaks. Perfect!
Refining the Mask and Adding Grass Texture
- Add a
Mathnode (Shift + A>Converter>Math). Place it after the Pointiness ColorRamp but before the Mix Shader factor. - Change the Math node’s operation to
Multiply. - Increase the bottom
Value(e.g., to2.0or2.7). This intensifies the white areas of the mask, bringing more rock onto the slopes. Tweak this value and the ColorRamp sliders until the distribution looks natural. - Add another
Image Texturenode. Open a seamless grass texture (again, Textures.com is a good source). - Connect this grass texture’s
Coloroutput to theBase Colorof the second Principled BSDF (the one connected to the Mix Shader’s bottom socket).
Now you have rock on the peaks and grass in the lower, flatter areas!
Completing the PBR Materials
Realism comes from more than just color. We need Roughness and Normal maps.
- For both the rock and grass textures, add corresponding
RoughnessandNormalmap textures usingImage Texturenodes. - Important: For both Roughness and Normal maps, set their
Color SpacetoNon-Colorin the Image Texture node settings. This is crucial for them to work correctly. - Connect the
Coloroutput of each Roughness map to theRoughnessinput of its respective Principled BSDF. - For Normal maps:
- Add a
Normal Mapnode (Shift + A>Vector>Normal Map). - Connect the
Coloroutput of the Normal map texture to theColorinput of theNormal Mapnode. - Connect the
Normaloutput of theNormal Mapnode to theNormalinput of its respective Principled BSDF. Adjust theStrengthif needed (usually 1.0 is fine).
- Add a
- (Optional) AO Maps: If your textures came with Ambient Occlusion (AO) maps, you can add them too. Use an
Image Texturenode (set toNon-Color), add aMixRGBnode (Shift + A>Color>MixRGB), set it toMultiply. Connect the main color texture (rock or grass diffuse) to theColor1input, and the AO texture’sColoroutput to theColor2input. Set theFac(Factor) to around0.8. Connect the MixRGB’s output to theBase Colorof the Principled BSDF (instead of the original direct connection). This adds subtle contact shadows baked into the texture.
A Note on Microdisplacement: You might wonder why we aren’t using microdisplacement (adaptive subdivision) for detail. While powerful, it was sometimes found to be experimental and prone to shading errors or instability in complex scenes like this at the time the original tutorial was made. Normal maps provide excellent detail for this kind of distant aerial shot and are very stable.
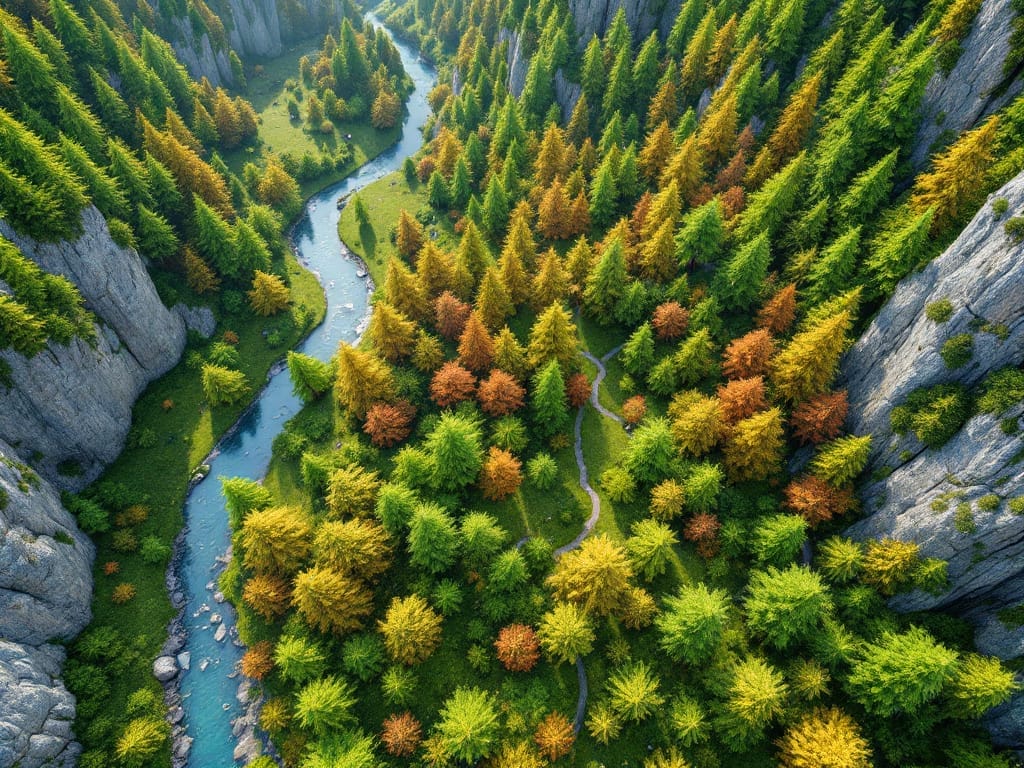
Populating Your World: The Trees 🌳
An empty landscape isn’t a forest. We need trees! Lots of them.
Getting Your Tree Models
We’ll use low-polygon trees for performance. You have options:
- Create Your Own: Follow a simple tutorial on making low-poly trees. There are many excellent short tutorials available online, including one referenced in the source video about creating a low poly tree in Blender (check description for potential links).
- Download Assets: If you subscribe to platforms like Patreon creators or use asset libraries, you might already have suitable low-poly tree models. The source video mentions Patreon supporters potentially get the model used.
For this guide, we assume you have at least one low-poly tree model ready. Let’s also create a variation – a dead tree.
- Append Your Tree:
- Place your 3D cursor somewhere convenient off to the side (
Shift + Right Click). - Go to
File>Append. - Navigate to the
.blendfile containing your tree model. - Click on the file, then go into the
Objectfolder. - Select your tree object(s) and click
Append.
- Place your 3D cursor somewhere convenient off to the side (
- Crucial Rotation: Select your appended tree(s). Press
1on the numpad for Front View. Rotate the tree(s) 90 degrees on the X-axis (R,X,90,Enter). It should be lying on its side. This seems strange, but it helps the particle system distribute them upright correctly later. - Create a Dead Tree Variation:
- If your tree uses a particle system for leaves (like the one in the linked tutorial might), simply duplicate the tree trunk/branch object (
Shift + D). - On the duplicated object, go to the
Particle Propertiesand delete the leaf particle system by clicking the-icon. Now you have a bare, dead-looking tree. - Make sure this dead tree is also rotated 90 degrees on its side in Front View.
- (Optional) Scale the dead tree slightly differently (e.g.,
S,Zto make it taller and thinner) for more visual interest.
- If your tree uses a particle system for leaves (like the one in the linked tutorial might), simply duplicate the tree trunk/branch object (
- Create More Variations (Optional but Recommended): Making a few different tree types (e.g., pine vs. deciduous shapes) or variations in size/bushiness adds immense realism to your forest. Repeat the appending/creation steps for any other models. Ensure all are rotated 90 degrees on their side.
Grouping for Distribution (Collections)
We need to tell the particle system which objects to distribute. In Blender 2.8+, we use collections.
- Select all your tree variations (the live ones, the dead one, any others).
- Press
Ctrl + G. This creates a new collection containing these objects and makes it the active collection. - Rename the Collection: In the Outliner (usually top-right), find the newly created collection. Double-click its name and rename it something memorable, like
Trees_Collectionor justTweezeas used in the source.
Mastering the Particle System: Distributing the Forest
Now, let’s use Blender’s particle system to plant our trees across the landscape.
- Select your landscape object.
- Go to the
Particle Propertiestab (the icon with dots emitting from a point). - Click the
+button to add a new particle system. - Change the type from
EmittertoHair. - Check the
Advancedcheckbox to reveal more options.
Setting Up Tree Instancing
We need to tell the particles to render as our trees, not as hair strands.
- Scroll down to the
Rendersection within the Particle Properties. - Change
Render AsfromPathtoCollection. - Under
Collection, click theInstance Collectionfield and select the collection you created earlier (e.g.,Tweeze).
You’ll likely see giant trees scattered randomly! Let’s fix that.
- Scale: Drastically reduce the
Scalevalue. Something very small like0.01might be a good starting point. You might also need to select your original tree models (off to the side) and scale them down (Skey) if they were modeled very large. A scale of0.2applied to the base models might be necessary. Fine-tune the particleScaleuntil the trees look appropriately sized for the vast landscape. - Object Rotation: Check the
Object Rotationbox within theRender>Collectionsettings. This tells the particles to respect the 90-degree rotation we applied earlier, making them stand upright.
Orientation and Randomness
Trees shouldn’t grow at weird angles sticking out of hillsides.
- Scroll up to the
Rotationsection (you might need to check the box to enable it). - Change the
Orientation AxisfromVelocity / HairtoGlobal Z. Now all trees should point straight up. - Add Randomness: Trees don’t grow perfectly straight or all face the same direction.
- Increase the
Randomizevalue underRotationslightly (e.g.,0.1). This gives a subtle tilt. - Increase the
Phasevalue. - Increase the
Randomize Phasevalue significantly (e.g.,0.5or more). This spins the trees around their Z-axis, ensuring you see different sides of the models, adding variation. - Go back down to the
Rendersection and add someScale Randomness(e.g.,0.4). This makes some trees slightly bigger or smaller than others.
- Increase the
Controlling Tree Types: The Dead Tree Ratio
Right now, you probably have a 50/50 mix of live and dead trees (or whatever variations are in your collection). Let’s make dead trees rarer.
- Scroll down to the
Render>Collectionsection again. - Check the
Use Countbox. - A list of the objects in your collection appears. Find your main live tree model(s) and increase their
Countvalue significantly. For example, set the live treeCountto10. Leave the dead treeCountat1.- Meaning: For every 10 live trees rendered, the system will render roughly 1 dead tree. Adjust these ratios based on the number of variations you have and the desired look. This adds realism – forests mostly consist of live trees, with only occasional dead ones.
- Optimization & Realism: Weight Painting 🖌️
Rendering thousands of trees across the entire massive landscape is inefficient if the camera only sees a fraction of it. We’ll use Weight Painting to tell Blender where to place trees. This also lets us remove trees from unrealistic locations (like sheer rock faces or riverbeds).
- Select your landscape object.
- Switch from
Object ModetoWeight Paint Mode(use the dropdown menu at the top-left of the viewport). Your landscape will turn blue. - Press
0on the numpad to look through your camera. - Your cursor is now a brush. Press
Fand drag the mouse to change the brush size. Make it quite large. - Start painting over the areas visible through the camera. Painted areas will turn red (representing a weight of 1.0). Cover everything you can see.
- (Optional) Press
7for Top View. Paint any remaining areas of the hills visible from the camera angle that you might have missed. Get reasonable coverage in the general camera direction. - Refining the Map: Trees don’t grow everywhere. Let’s remove them from some spots.
- In the tools panel (often on the left, press
Tif hidden), change the brushWeightto0.0and theBlendmode fromMixtoSubtract. - Paint over the very peaks and sharp ridges of your mountains where trees likely wouldn’t grow. These areas will turn blue again.
- Paint some winding paths or areas through the forest to simulate clearings, gullies, or small rivers where trees might be flooded out or unable to grow. This breaks up the uniformity.
- In the tools panel (often on the left, press
- Applying the Weight Map:
- Switch back to
Object Mode. - Go back to the
Particle Properties. - Scroll down to the
Vertex Groupssection. - Click in the
Densityfield and select the vertex group that was automatically created during weight painting (usually called “Group”).
- Switch back to
Instantly, the trees disappear from the blue areas and are concentrated only in the red/yellow/green areas you painted! This dramatically improves viewport performance and rendering efficiency, focusing resources where they matter. Adjust the total Number of particles (at the top of the particle settings) to get the desired forest density. Start with 1000, then increase as needed – maybe 10,000 or more for a dense look, depending on your system.
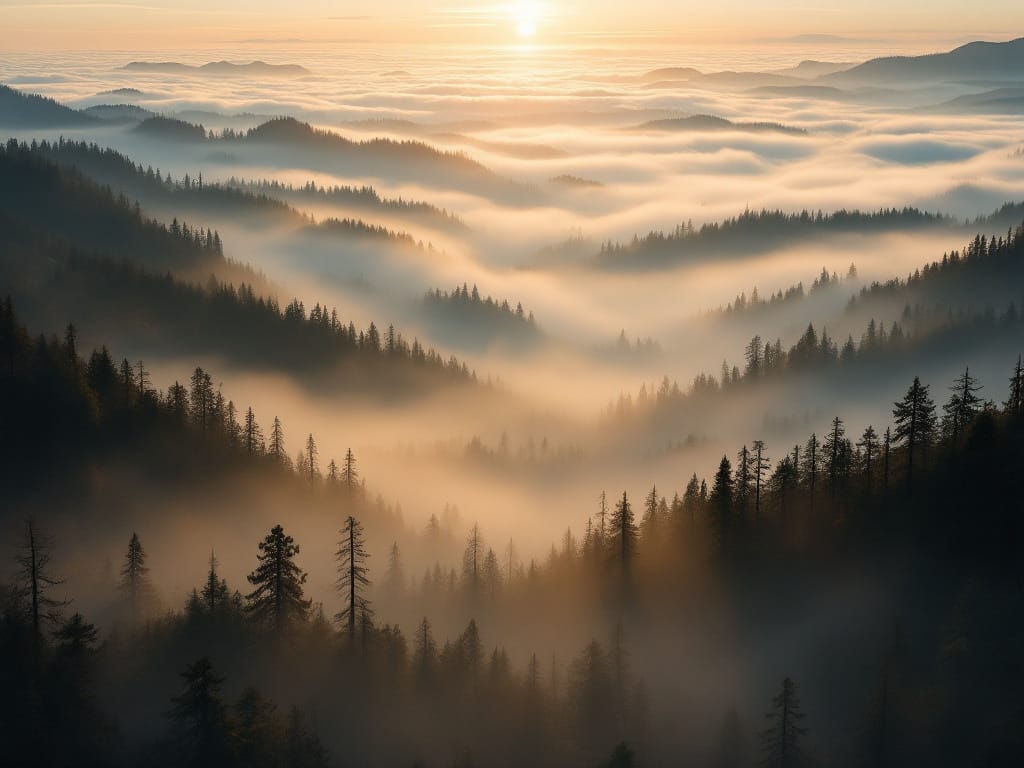
Beyond Volumetrics: Crafting Ethereal Mist 🌫️
Atmosphere is key to conveying scale in large landscapes. While Blender has volumetrics and a Mist Pass, these can be slow to render or lack fine control. Here’s a clever, faster method using textured planes.
Creating the Fog Material
- Place your 3D cursor off to the side (
Shift + Right Click). - Add a new Plane (
Shift + A>Mesh>Plane). - Press
.(period) on the numpad to zoom in on the plane. - Scale it along the Y-axis (
S,Y) to make it rectangular, perhaps twice as long as it is wide. - Go to the
Shader Editorand create aNewmaterial for this plane. - Delete the default
Principled BSDFnode. - Add an
Emissionshader (Shift + A>Shader>Emission). - Add a
Transparent BSDFshader (Shift + A>Shader>Transparent BSDF). - Add a
Mix Shader(Shift + A>Shader>Mix Shader). - Connect
Transparent BSDFto the top input of the Mix Shader. - Connect
Emissionto the bottom input of the Mix Shader. - Connect the
Mix Shaderoutput to theSurfaceinput of theMaterial Output.
The Wispy Noise Texture
Now, we create the fog’s texture.
- Add a
Noise Texturenode (Shift + A>Texture>Noise Texture). - Add a
ColorRampnode (Shift + A>Converter>ColorRamp). - Connect the
Facoutput of the Noise Texture to theFacinput of the ColorRamp. - Connect the
Coloroutput of the ColorRamp to theFacinput of theMix Shader. - Tweak the
Noise Texture:Scale: Try around4.0or5.0.Detail: Increase to5or higher for more complexity.Distortion: Add some distortion, maybe0.7, to give it a wispy, swirling look.
- Adjust the
ColorRamp:Ctrl + Shift + Clickthe ColorRamp to preview it.- Drag the black slider significantly to the right (e.g., past the halfway mark).
- Drag the white slider slightly to the left.
- Click on the white color stop. Change its
Value(in the HSV color model) way down to something like0.1or0.18. Make it a very dark grey. This ensures the fog isn’t overly bright or opaque.
Fading the Edges
The plane has sharp edges. Let’s fade them out.
- Add a
Gradient Texturenode (Shift + A>Texture>Gradient Texture). - Change its type from
LineartoSpherical. - Add a
Texture Coordinatenode (Shift + A>Input>Texture Coordinate). - Connect the
Objectoutput of the Texture Coordinate node to theVectorinput of theGradient Texture. (Also connect thisObjectoutput to theVectorinput of theNoise Texturewe added earlier). - Preview the Gradient Texture (
Ctrl + Shift + Click). You should see a white circle fading to black at the edges of the plane. - Add a
MixRGBnode (Shift + A>Color>MixRGB). Place it after the Noise Texture’s ColorRamp but before the Mix Shader’s Factor input. - Change the MixRGB node’s blend mode to
Multiply. - Connect the output of the Noise Texture’s ColorRamp to
Color1. - Connect the
Facoutput of theSpherical Gradient TexturetoColor2. - Set the
Fac(Factor) of the Multiply node to1.0. - Connect the output of this
Multiplynode to theFacinput of the mainMix Shader.
Now preview the final Mix Shader output (Ctrl + Shift + Click). You should have a wispy, cloud-like texture that fades out completely at the edges of the plane.
(Optional) Give the Emission shader a very slight color tint – maybe a pale yellow, green, or blue – for mood.
Let’s rename this fog plane object to something like Fog_Plane_Source.
Deploying the Fog: Weaving Mist Through the Mountains
We have our fog material plane. Now, let’s distribute instances of it throughout the scene using another particle system.
- Go back to your main 3D Viewport.
Shift + A>Mesh>Plane. Create a new, large plane. - Scale this new plane (
S) so it covers a large portion of your scene, particularly the middle distance and background areas visible to the camera. - Position this large plane (
G,Z) vertically so it sits within the mountain range – some peaks should be above it, and valleys below it. This plane will be the emitter for our fog particles. Let’s name itFog_Emitter_Plane. - With
Fog_Emitter_Planeselected, add a newParticle System. - Again, set it to
Hairand enableAdvanced. - Under
Render, setRender AstoObject. - In the
Instance Objectfield, select yourFog_Plane_Sourceobject (the one with the fog material). - Adjust the
ScaleandScale Randomness(e.g.,0.5randomness) until the fog patches look appropriately sized. You’ll need a largerScalevalue than the trees. - Enable
Rotation. SetOrientation AxistoGlobal Z. - Crucial Step: Use the
Phaseslider under Rotation to rotate all the fog planes until they generally face the camera. Look from the Top View (7) to help visualize this. They dont need to be perfect, just generally oriented towards the view. - Add some
Randomize Phaseto vary their rotation slightly. - Increase the
Numberof particles significantly (e.g., start with500, maybe go to1000or2000) until you achieve the desired fog density.
Hiding the Emitter and Fixing Transparency
We don’t want to see the large emitter plane itself.
- On the
Fog_Emitter_Planeobject:- In the
Particle Properties, under theRendersection, uncheckShow Emitter. - Go to the
Object Properties(orange square icon). UnderVisibility>Ray Visibility, uncheckCamera. (Alternatively, give the emitter plane a fully transparent material itself by creating a new material, deleting the Principled BSDF, and adding only a Transparent BSDF connected to the output).
- In the
- Transparency Bounces: You might see black squares or rendering artifacts where fog planes overlap. This is because Cycles limits how many transparent surfaces a ray can pass through by default.
- Go to
Render Properties>Light Paths>Max Bounces. - Increase the
Transparentbounces significantly. Try32or64, maybe even128if needed. This allows light to pass through many layers of fog planes correctly. This will increase render times.
- Go to
- Optimizing Fog Planes: To speed up rendering slightly, tell Blender the fog planes themselves don’t need to interact with all light types.
- Select your original
Fog_Plane_Sourceobject (the one with the material). - Go to
Object Properties>Visibility>Ray Visibility. - Uncheck everything except
Camera. This means the planes won’t cast shadows, reflect light strongly, etc., simplifying calculations.
- Select your original
Now, look through your camera (0). You should see layers of misty fog weaving through your forest landscape, adding depth and scale! Adjust the vertical position (G, Z) of the Fog_Emitter_Plane and the particle Number and Scale to perfect the effect. ✨
Bringing Your Vision to Light: Rendering & Compositing
You’ve built a world! Now it’s time to capture it.
- Final Render Settings: Double-check your
Render Properties. Ensure Cycles is selected, GPU Compute (with OptiX if available) is active. Set your desired output resolution and sample count (more samples = less noise but longer render time; start with 128 or 256 and increase if needed). - Rendering: Press
F12to render a still image. For animations, you’d set up camera movement, set an output file path and format (like PNG sequence or MP4), and hitCtrl + F12to render the animation. - Render Farms: For large resolutions or animations, rendering locally can take hours or days. This is where services like Concierge Render Farm become incredibly useful, distributing the work across many machines for rapid results.
- Compositing: The raw render is often just the start. Blender’s Compositor allows for final touches like color grading, adding glow/glare, lens distortion, vignetting, and more to enhance the mood and realism. Access it via the
Compositingworkspace tab. Basic steps involve enablingUse Nodes, adding aViewernode (Ctrl + Shift + Clickthe Render Layers node), and inserting nodes likeGlare,Color Balance, orLens Distortionbetween theRender LayersandComposite/Viewernodes. (The provided transcript cuts off before detailing compositing steps).
Conclusion: Your Forest Awaits
Creating vast, atmospheric forest scenes in Blender is well within reach using these techniques. By leveraging the ANT Landscape generator for quick terrain, smart texturing with procedural masks, efficient particle systems optimized with weight painting, and a clever plane-based fog method, you can build truly epic environments without overwhelming your system. The combination of these tools offers immense creative freedom. Don’t be afraid to experiment with different landscape settings, texture combinations, tree variations, and fog densities. The digital wilderness is yours to shape!

1 Minute Low Poly Tree Tutorial: https://www.youtube.com/watch?v=y7PdiGXbrD0
HDRI: https://hdrihaven.com/hdri/?c=outdoor&h=table_mountain_1
Rock Texture: https://www.textures.com/download/3dscans0422/133306?q=rock+sharp
Grass Texture: https://www.textures.com/download/pbr0426/137222?q=grass
Youtube video supporting the article
A game developer that wants to share its knowledge and experience with other game developers-


